

 |
 |
Here's a follow-up article on TDG to show you the easy way to configure the procmail program.
by Jesper Pedersen
In this article, I'll describe how to configure procmail using The Dotfile Generator (TDG for short). This will include:
If you haven't downloaded the program, now is the time to do it. The home page of TDG at http://www.imada.uo.dk/~blackie/dotfile/ provides a list of mirror sites. An earlier article, giving details about the program and the installation of TDG, appeared in Linux Journal October 1997, Issue 42.
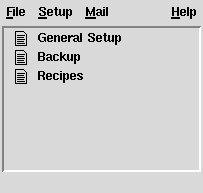
To start TDG with the procmail module, type dotfile<\!s>procmail, and the window shown in Figure 1 will appear. As you can see, the module is split into three pages. The first two are very simple, so let's start with the page called General Setup. This page is shown in Figure 2.
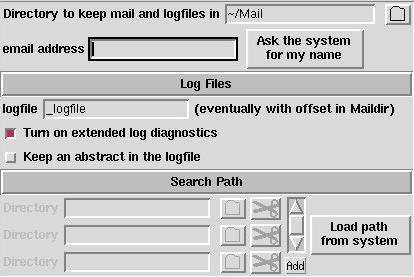
On this page there are four items to configure:
Since procmail handles your incoming mail, security is very important to this module. You can back up your incoming mail in three different ways. To do this, go to the page called Backup shown in Figure 3.
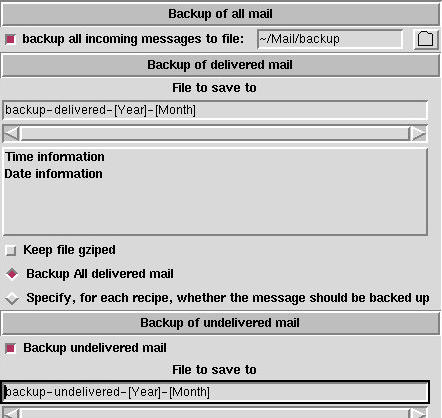
The first backup category is ``back up all incoming mail''. The code needed by the procmailrc file to do this is typed in the very first field. This is done to avoid any errors in the generated procmail file that might cause any of your mail to be thrown away. This sort of backup is only a good idea when you first start to use the generated procmail file. The main drawback is that all incoming mail is saved in one file, so this file can become very big, very quickly.
The second method is to backup all incoming mail that is delivered by procmail. This method makes it easy to verify that mail is sorted into the right places.
The third method is to back up all mail that makes it to your incoming mailbox. This mail is often personal mail; that is, it did not come from a mailing list, and it is not junk mail.
In the first method, the full file name must be specified. This is because this method has to be 100% foolproof. In the other two methods, you may build the file names from the current date and time. This makes it possible to save this sort of mail to folders for the current year/month/week, e.g., a folder called backup-delivered-1997-July. As an additional feature, you may compress the files as gzipped files.
The backup of delivered mail can be specified for each individual recipe or for all recipes at once. (See Figure 4, check box 9.) The FillOut elements, which configure the saved file are discussed in the previous article.
In procmail a central concept is a recipe, which is a set of conditions and a set of actions. All of the actions are executed if all of the conditions are fulfilled. A few examples of conditions appear below:
A list of actions includes:
A procmail configuration is a sequence of recipes. When a letter arrives, each recipe is checked to see if all of its conditions are fulfilled. If they are, the actions of the recipe are executed.
Procmail will finish testing recipes when one is matched, unless a flag is set to tell it that this recipe should not stop delivery (see Figure 4 check box 8). This means that the order of the recipes is important, since only the first recipe to match will process the letter.
If none of the recipes are fulfilled, or if the ones which are fulfilled have check box 8 in Figure 4 set, the letter is delivered to the incoming mailbox as if the procmail filter did not exist.
You configure the recipes on the page called ``Recipes''. This page can be seen in Figure 4.
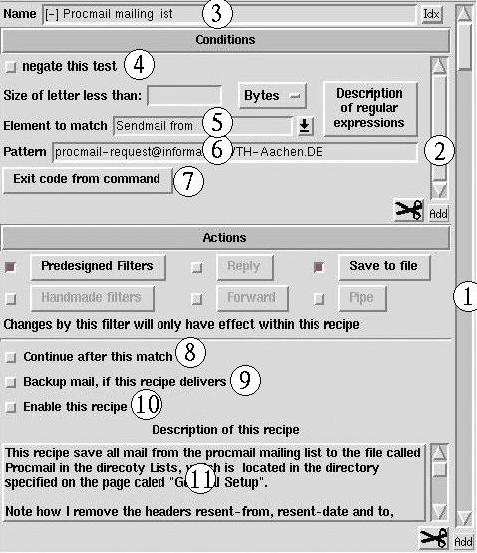
What you see here is an ExtEntry. An ExtEntry is a widget, which repeats its elements as many times as necessary (just like a list box repeats the labels). Everything on this page is one single recipe. To see a new recipe, you have to scroll the outer scroll bar (1). To add a new recipe, you have to press the Add button beneath the scroll bar.
As described above, a recipe is a set of conditions. This set is also represented with an ExtEntry (2). To scroll to another condition in a recipe you must use the scroll bar (2), and to add a new condition you must use the button below scroll bar (2).
Each recipe can be given a unique name to make it easier to find a given recipe. This name is also written to the file with mail delivered by recipes (method 2 above), so that you can see which recipe matched the actual letter. To give a recipe a name, use entry (3). A button labeled Idx is located at the right side of the entry. This is a quick index to the outer ExtEntry (i.e., the recipes). If you press this button, a list box drops down from which you can select one of the recipes by name.
The most common condition to set up is to match one of the header fields with a given regular expression, or to match the body of the letter with a given regular expression. A typical header is shown in Listing 1.
The very first line of the header is special and has been written by the program (often sendmail) sending the letter. This header field is always the same for a given mailing list, so to sort mail from a mailing list, it is a good idea to view the letter with an ordinary file reader (a mail reader will seldom show this line). Copy this information to the pattern field (Figure 4, label (6) ). As the element to match, you have to select "Sendmail from" in entry (5).
Three special macros exist in procmail. These may be used when matching header fields:
To see what these macros stand for, please refer to the procmailrc man page.
There are many header fields to choose between in the pull down menu (5), but if the one you wish to select isn't located there, you may type it yourself.
The check box (4) may be used to negate the condition, i.e., if the pattern does not match, the condition is fulfilled.
So far, I have mentioned that you can type a regular expression in box (6). In most cases, it may not be necessary to know anything about regular expressions since the procmail module will take care of most of it for you. One thing may be worth knowing, and that is that you may match ``anything'' with ".*". This means that abc.*def will match anything which starts with abc and ends with def, e.g., abcdef or abcXXXXdef. To read a more detailed description of the set of regular expressions used by procmail, press the button labeled Description.
One common pitfall is to forget to match everything at the start of the line. If you wish to set up a regular expression for the From: field above, it is not enough to give the pattern: rick@helix.nih.gov, since this is not at the start of the line. Instead, to tell procmail that every mail message which includes the text rick@helix.nih.gov is to be handled, insert .* in front of the e-mail address.
A final way to set up a condition is by using an external program to verify some conditions. This is done by pressing button (7) which brings up a window with a FillOut field like the one in Figure 3. This time, however, the entry has been replaced with a text box. In this text box, you can type some commands to read either the header or the body on standard input. These commands can refer to any header fields from the letter. The lines (separated by a newline) are joined together with a separating semicolon, making each line a separate command.
Procmail will consider the condition fulfilled only if the exit code from the program is 0. This behavior can be changed with the check button (4) in Figure 4.
The actions that this module can handle are split into six parts. These are described in detail below. To activate an action, you first have to select the check box that is located next to it, making it clear which actions are enabled for a given recipe.
To set up a filter, press the button labeled Predesigned Filters in the window. This filter can change the header fields, add new header fields and/or remove existing header fields.
On this page you will find one custom-made filter: Remove signatures. With this filter, you may specify a signature for each e-mail address. If the text you specify is found (exactly), it will be removed from the letter. My intention is to add more custom-made filters as users send me their ideas and filters.
If you wish to create your own filter, you must go to the page Handmade Filters. On this page, you may send the header and/or the body of a letter through a command.
As an example, you may remove the header with the command
cat ->> /dev/nullor add a message to the body of a message with the command:
echo This letter has been resent to you, by my\
procmail filter!; cat -
If only the filter action is selected, the filter will change the letter permanently, i.e. the changes will affect the subsequent recipes (even on the delivered letter, if no recipes match). This may be useful if you use a mail reader that does not support MIME, and you have a filter to convert MIME-encoded text to 7-bit ASCII. If, however, one of the other actions is also enabled, the changes affect only this recipe.
With the reply action you can set up a reply mechanism, which sends a letter back to the sender with a message that you specify. One feature of this mechanism is that you can specify how often a reply should be sent. You have the following choices:
This action is useful if you leave on vacation, and wish to send a message that you will not read your letter at once.
The reply is sent only if the letter does not come from a daemon, to avoid sending a reply to every message on a mailing list.
With the forward action, you may forward letters to other e-mail accounts.
With this action, you can save the letter to a file. The file name is specified with a FillOut widget, just as you specified the name of a file for backups. This time, however, you have two additional features: you can use the content of a header field, or you can use the output from a command. In Figure 5, you can see how to select a header field to extract as part of the file name.
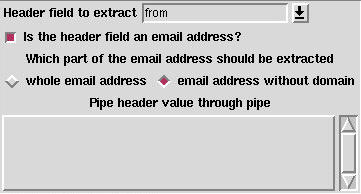
E-mail addresses can be specified in three ways:
If you specify that the field is an e-mail address, you may also specify whether you wish to extract the user name with or without the domain name.
Finally, you can pipe the header field though a specified command. This command can read the value of the header field on standard input and write to standard output.
With the pipe action, you can specify a command to take care of the letter. This command can read the letter on standard input but cannot write anything (it is ignored).
The procmail file generated from TDG contains lots of comments to make it easy for you to find a specific recipe.
Should something go wrong, you may turn on the extended diagnostic option. This will write additional lines to the log file to show you what it does. For debugging, you must read both the log file and the procmail file.
If you use the log abstract options, you will find the program mailstat very useful. It tells you how many letters have been delivered where. One line in the output from the mailstat programs is fake: /bin/false--it may be safely ignored. When you wish to delete a letter in a way that you can explicitly see that it has been removed, you should deliver it to the file called /dev/null. Please note that you can only use the mailstat program if the extended diagnostic option is turned off.
Before procmail starts filtering all your incoming mail, you must add the following line (i.e., no break) to the file called ~/.forward:
"|IFS=' ' &&exec /usr/local/bin/procmail -f-||exit 75with the correct path name for procmail, and username replaced by your e-mail address.

Jesper Pedersen lives in Odense, Denmark, where he has studied computer science at Odense University since 1990. He is a system manager at the University and also teaches computer science. In his spare time, he does Jiu-Jitsu, listens to music, drinks beer and has fun with his girlfriend. His home page can be found at http://www.imada.ou.dk/~blackie/ and he can be reached via e-mail at blackie@imada.ou.dk.