
 |
 |
An introduction to MMX and how to take advantage of its capabilities in your programs.
By Ariel Ortiz Ramirez
Commercially introduced in January 1997, the MMX technology is an extension of the Intel architecture that uses a single-instruction, multiple-data execution model that allows several data elements to be processed simultaneously. Applications that benefit from the MMX technology are those that do many parallelizable computations using small integer numbers. Examples of these kinds of applications are 2-D/3-D graphics, image processing, virtual reality, audio synthesis and data compression.
If your Linux system has a Pentium II or a Pentium with MMX technology, you can build programs that take advantage of the MMX instruction set using gcc and a bit of assembly language. In this article, I will briefly introduce the main features of the MMX technology, explain how to detect whether an x86 microprocessor has built-in MMX capabilities and show how to program a simple image processing application.
The assembly language code presented here uses NASM, the Netwide Assembler. NASM employs the standard Intel syntax instead of the AT&T syntax used on many popular UNIX assemblers, such as GAS.

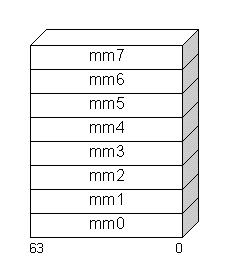
Figure 1. MMX Register Set
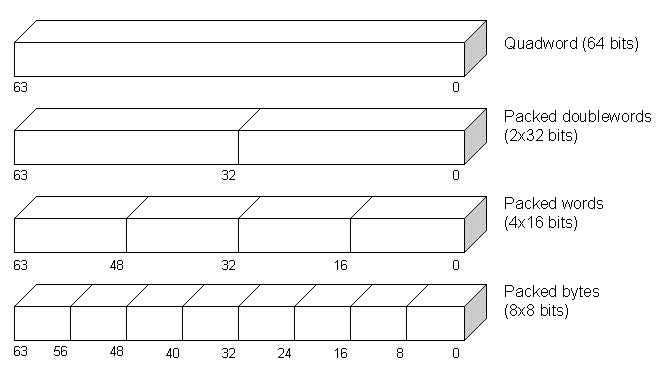
The MMX technology extends the Intel architecture by adding eight 64-bit registers and 57 instructions. The new registers are named MM0 to MM7 (see Figure 1). Depending on which instructions we use, each register may be interpreted as one 64-bit quadword, two packed 32-bit double words, four packed 16-bit words, or eight packed 8-bit bytes (see Figure 2).

Figure 2. MMX Data Types
The MMX instruction set comprises several categories of instructions, including those for arithmetic, logical, comparison, conversion and data transfer operations.
The syntax for MMX instructions is similar to other x86 instructions:
OP Destination, SourceThis line is interpreted as:
Destination = Destination OP SourceExcept for the data transfer instructions, the destination operand must always be any MMX register. The source operand can be a datum stored in a memory location or in an MMX register. A few specific MMX instructions will be discussed further on.
Before running a program that uses MMX instructions, it is important to make sure your microprocessor actually has MMX support. Your Linux system should be an Intel x86 or compatible microprocessor (386, 486, Pentium, Pentium Pro, Pentium II, or any of the Cyrix or AMD clones). This is easily checked by executing the uname -m command. This command should return i386, i486, i586 or i686. If it does not, your Linux system runs on a non-x86 architecture.
In order to determine if your CPU supports MMX technology, use the assembly language CPUID instruction. This instruction reveals important processor information, such as its vendor, family, model and cache information. Unfortunately, the CPUID instruction is present only on some late 80486 processors and above. So, how do you know if CPUID is available on your system? Intel documents the following trick: if your program can modify bit 21 of the EFLAGS register, then the CPUID instruction is available; otherwise, you are working with an aged CPU. See Listing 1 (lines 12-29) to learn how this can be done.
Next, request CPU feature information by putting a value of 1 in the EAX register and executing the instruction. The resulting value is returned in bit 23 of the EDX register. If this bit is on, the processor supports the MMX instruction set; otherwise, it does not. Listing 1 (lines 43-50) shows how to do this.
Programs should contain two versions of the same routine: one using MMX technology and one using regular scalar code. At runtime, the program can decide which routine it should actually call.
If MMX instructions are executed in a system that does not support them, the CPU will raise an ``invalid opcode exception'' (interrupt vector number 6) which is trapped by the Linux kernel. The Linux kernel in turn sends an ``illegal instruction signal'' (code number 4) to the offending process. By default, this action terminates the program and generates a core file.

Figure 3. Original Gray-Scale Image
Let's suppose we have a gray-scale bitmap image, like the one in Figure 3. Each pixel is stored in one unsigned 8-bit byte contained in an array. Smaller numbers represent darker tones of gray, while larger numbers represent brighter tones. Numbers 0 and 255 represent the pure black and white colors, respectively. For the sake of code simplicity, the images employed in this program (see Listing 2 in the archive file) use Microsoft Windows' gray-scale BMP file format. John Bradley's xv utility can easily be used under Linux to create and display this kind of bitmap image.
To make the image brighter, we just need to add a positive integer (let's say 64 hexadecimal) to each of its pixels. In C, we would have something like this:
#define BRIGHTENING_CONSTANT 0x64
unsigned char bitmap[BITMAP_SIZE];
size_t i;
/* Load image somehow ... */
for(i = 0; i < BITMAP_SIZE; i ++)
  bitmap[i] += BRIGHTENING_CONSTANT;

Figure 4. Brightened Image Using Wraparound Arithmetic
Unfortunately, we end up with the undesired image found in Figure 4. This happens because of wraparound; if the result of the addition overflows (i.e., exceeds 255, which is the upper unsigned 8-bit byte limit), the result is truncated so that only the lower (least significant) bits are considered. For example, adding 100 (64 hexadecimal) to a pixel value of 250 (almost pure white) gives the result shown below.
    250 decimal       11111010 binary
  + 100 decimal    +  01100100 binary
  -------------    ------------------
  = 350 decimal    = 101011110 binary   Overflow
                                        produced
  =  94 decimal    =  01011110 binary   Take the 8
                            least significant bits
The result is 94 which produces a darker gray instead of a
brighter one, causing the observable inversion effect.
What we require is that whenever an addition exceeds the maximum limit, the result should saturate (clipped to a predefined data-range limit). In this case, the saturation value is 255, which represents pure white. The following C fragment takes care of saturation:
int sum;
for(i = 0; i < BITMAP_SIZE; i ++)
  {
  sum = bitmap[i] + BRIGHTENING_CONSTANT;
  /* UCHAR_MAX is defined in <limits.h>
   * and is equal to 255u */
  if(sum > UCHAR_MAX)
    bitmap[i] = UCHAR_MAX;
  else
    bitmap[i] = (unsigned char) sum;
  }
Now we obtain the image shown in Figure 5, which is brightened as we
wanted.

Figure 5. Brightened Image Using Saturation Arithmetic

Figure 6. Unsigned Byte-Packed Addition with Saturation
MMX technology allows us to do this saturated arithmetic addition on eight unsigned bytes in parallel using just one instruction: paddusb. Figure 6 shows an example of how this instruction works. Our image-brightening algorithm (see Listing 1, starting at line 61) can be described as follows:
Whenever we finish executing MMX instructions, the emms instruction (Listing 1, line 81) should be used to clear the MMX state. This is an important issue, especially if any floating-point instructions follow in our program. In order to make the MMX technology compatible with existing operating systems and applications, Intel engineers decided the MMX registers should share the same physical space with the floating-point registers. This was considered necessary because, for example, in a multi-tasking operating system such as Linux, whenever a task switch occurs, the running process must have its state preserved in order to be resumed some time in the future. This state preservation involves copying all of the CPU's registers into memory. If you add more registers to the CPU, you must also modify the operating system code that takes care of saving the registers. However, if your new registers are aliased to existing registers, no change is required in the code.
Unfortunately, this workaround in the case of MMX and floating-point registers has a major drawback: you cannot use both types of registers at the same time, simply because they represent two very different types of data. The general rule is you cannot mix MMX and floating-point instructions in the same portions of code. Therefore, the emms instruction is the mechanism of informing the CPU that future floating-point instructions are allowed in the program.
Is all this worth the trouble? The answer to this question depends on the importance you give to speed. Comparing the MMX example program to a pure C language version, the speed improvements speak for themselves. The MMX routine is roughly 14 times faster than the C version (Listing 2 in the archive file) when compiled with no optimizations and about five times faster when full -O2 optimizations are enabled. Of course, you will lose portability and will probably have a harder time writing and debugging assembly language code. Life's full of tough choices, isn't it?

Ariel Ortiz Ramirez is a faculty member in the Computer Science Department of the Monterey Institute of Technology and Higher Education, Campus Estado de Mexico. He has been using Linux to teach x86 assembly language for two semesters now. Although he has taught several different programming languages for almost a decade, he personally has much more fun when programming in Scheme. He can be reached at aortiz@campus.cem.itesm.mx.