Printer Configuration and Setup
Once you have evaluated your needs and have procured your printers and supplies, it is now time to deploy them in your computing environment. Red Hat Linux has many utilities designed to ease the deployment cycle and get your organization printing quickly. Red Hat Linux includes several configuration tools for printing and networking that you can use in a graphical or command line environment. Additionally, the configuration tools included can be administered remotely for added convenience if issues arise while you are away.
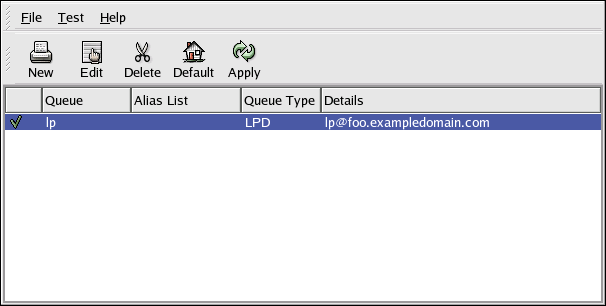
The Printer Configuration Tool is a utility for Red Hat Linux that allows administrators to add, edit, and configure printer hardware to work in a local or networked environment. The interface is designed to make printer setup and administration less complex than editing configuration files manually. Administrators can use the Printer Configuration Tool on local printers attached to workstations, and even share such printers to other users on the network. The Printer Configuration Tool uses an IPP-compatible backend well-suited for network printing. Figure 7-1 shows the Printer Configuration Tool in action.
An Example Setup
If you are administrating a local network and wish to allow users to print to a laser printer, the most ideal solution would be a laser printer with an Ethernet port to hook up to your network. If you have multiple printers (or a printer without network access in the hardware), you can create a print server that handles all print jobs and queues the jobs based on arbitrary criteria. A decommissioned workstation or server is a perfectly suitable machine to be re-purposed for print serving. Plug your printer (by parallel port or USB, if supported) into your server, install Red Hat Linux, and choose an installation type that will install the proper printer services on your system. If you desire a more streamline selection of packages for the print server, choose a Custom installation type. If you are not sure what packages you will need, choose the Server installation type, which will install all the packages needed to configure a printer and setup a connection to share the printer to clients on the network via Samba or the printer daemon. For more information about installing Red Hat Linux on your system, refer to the Official Red Hat Linux Installation Guide.
Once you have your system running Red Hat Linux, you can now begin printer configuration. You may use either the text or graphical version of the Printer Configuration Tool (you must have the X Window System [or X] installed and loaded in order to use the graphical version). Start the tool at a shell prompt by typing redhat-config-printer-tui for the text version. For the graphical version, if you have the graphical desktop loaded, choose Main Menu => System Settings => Printing or type redhat-config-printer at a shell prompt.
 | Note |
|---|---|
The Printer Configuration Tool saves any printer configurations made to the file /etc/printcap. If you have any printer configurations that you wish to add outside of the Printer Configuration Tool, you must add them to the file /etc/printcap.local, or it will be deleted whenever you run the tool or reboot your server. |
To add a new printer:
Click the New button and type a queue name. The name should be descriptive enough to distinguish itself with other printers or network resources (such as workgroup_laser or thirdfloor_inkjet).
Choose a printer Queue Type from the list. Since you are configuring a print server, you will most likely choose a Local Printer Device since the printer will be attached physically to the server. For configuring JetDirect printers or printers attached to Windows (via SMB) or Netware (Novell) machines, refer to the chapter called "Printer Configuration" in the Official Red Hat Linux Customization Guide.
You have the option to select the Printer Device shown, rescan your devices for the correct device, or create your own custom device. This will be the /dev entry that represents the interface between the device driver and the printer itself. In most instances, the device will be named /dev/lp0.
Now you can choose a Printer Driver by selecting one from the extensive list. Choose the printer make and model, and select the driver. Drivers marked with an asterisk (*) are recommended drivers. If you are configuring a remote printer or a printer that does not have a corresponding driver for its make and model, the safest choice would be Postscript Printer (for JetDirect printers, Raw Print Queue is recommended).
Print a test page to make sure your printer is working properly.
Once the printer and print server is installed and configured properly, you should configure client computers to access the print server. The instructions are the same as those to configure the printer on the print server; however, instead of a local printer, you should choose a UNIX Printer queue type and type the print server hostname and port (usually 631) into the appropriate fields.Clients should now be able to begin printing.
Any post-install configuration on printers or the print server can be done via the Printer Configuration Tool by clicking Edit and choosing the Driver Options.
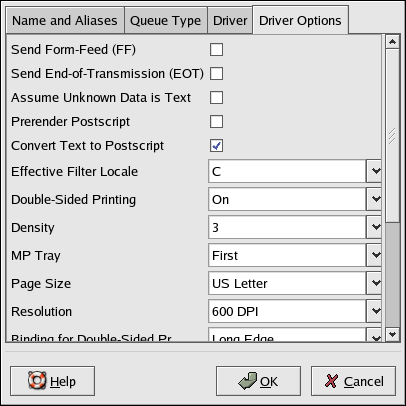
You can configure printer elements such as paper size, Postscript pre-rendering in the print driver itself (to deal with international glyphs such as Asian characters on a non-Asian character printer), page size, and more. For more information on driver options, refer to the Official Red Hat Linux Customization Guide.